
When it comes to eye makeup, your brushes are just as important as your eyeshadow palette. Many beginners invest in expensive eyeshadows but overlook the power of the right brushes. Using the right eye makeup brushes can completely transform your application, blending, and final look. Whether you dream of soft, natural eyes or bold, dramatic smokey eyes, your brushes are the tools that make it possible.
In this beginner-friendly guide, we’ll break down the must-have eye makeup brushes, how to use each one, how to care for them, and some helpful tips to make your eye makeup look flawless — even if you’re a total beginner!
Why Eye Makeup Brushes Matter
Before we jump into the brushes themselves, let’s understand why brushes matter so much.
-
Precision: Brushes give you control. Your fingers or sponge applicators can only do so much — brushes help place color exactly where you want it.
-
Blending: The secret to pro-looking eye makeup is blending. Brushes allow you to blend colors smoothly, avoiding harsh lines.
-
Hygiene: Brushes are more hygienic than fingers, especially for sensitive eye areas.
-
Finish: The right brush picks up and deposits pigment evenly, giving you better color payoff and less fallout.
If you’ve ever felt frustrated because your eyeshadow doesn’t look like it does in tutorials, chances are your brushes (and technique) need an upgrade!
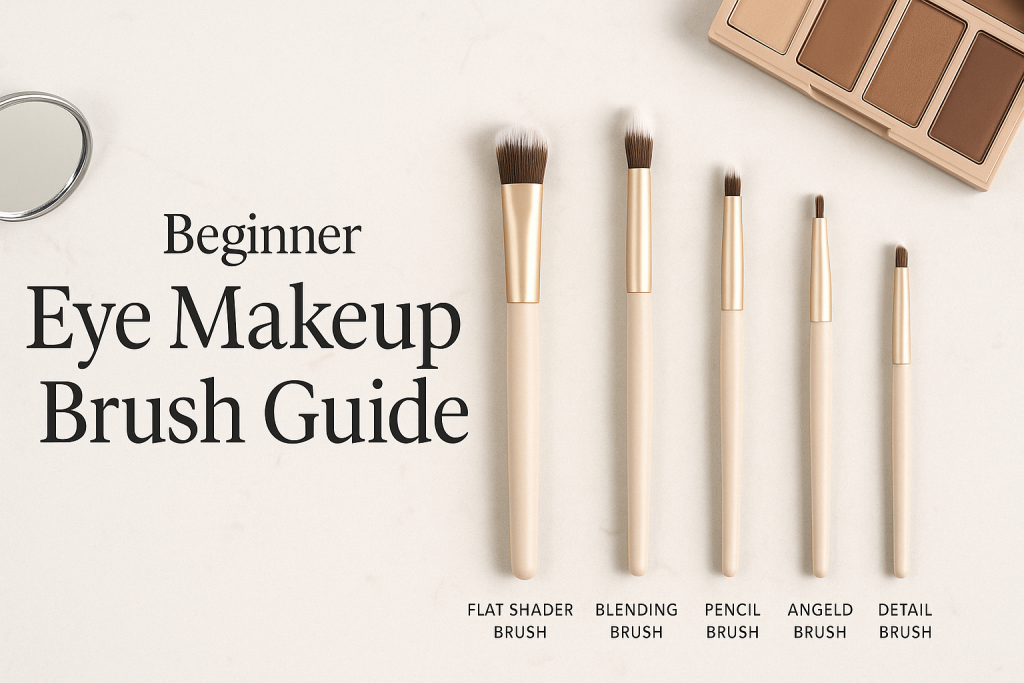
Basic Must-Have Eye Makeup Brushes for Beginners
You don’t need a huge brush set when you’re starting out. Here are the essential eye makeup brushes every beginner should have in their makeup bag:
Flat Shader Brush
Use: To pack eyeshadow color onto your eyelid.
A flat shader brush has firm, dense bristles that pick up a lot of pigment. It’s perfect for applying shimmer or matte shadows directly to your lid.
Tip: For extra intensity, dampen your brush with a setting spray before picking up shimmer shades.
Blending Brush
Use: To blend eyeshadow in your crease and soften edges.
This is the most important brush in your kit! A fluffy blending brush helps diffuse harsh lines and blend multiple colors seamlessly.
Tip: Use windshield wiper motions in your crease for a smooth blend.
Pencil Brush
Use: For detail work.
A pencil brush has a small, tapered tip, perfect for adding shadow to your lower lash line, inner corner, or precise crease work.
Tip: Dip your pencil brush in a darker shade to smudge out eyeliner for a soft smokey effect.
Angled Brush
Use: For eyeliner or brows.
An angled brush is firm and precise, ideal for applying gel eyeliner, powder liner, or filling in your brows with powder or pomade.
Tip: Wet your angled brush with water or setting spray to make powder shadow work like eyeliner.
Small Detail Brush
Use: For tiny highlights or glitter.
A small, stiff brush helps you place shimmer or highlight in your inner corner or under the brow bone.
Optional (But Nice to Have) Brushes
Once you master the basics, you can expand your collection with these:
-
Smudge Brush: To smudge eyeliner or shadow along the lash line for a smokey look.
-
Cut Crease Brush: A small, flat brush perfect for carving out a cut crease with concealer.
-
Large Fluffy Brush: For diffusing color all over the lid or for a final soft blend.
How to Use Your Eye Makeup Brushes — Step by Step
Now that you know the brushes, here’s how to use them in a simple, beginner-friendly routine:
✅ Step 1: Prime your lids
Use an eyeshadow primer or concealer to create a smooth, crease-free base.
✅ Step 2: Apply a base shade
Using the flat shader brush, apply a neutral color all over your lid.
✅ Step 3: Define the crease
Pick up your blending brush and sweep a medium-toned matte shadow into your crease using back-and-forth motions.
✅ Step 4: Deepen the outer corner
Use your blending or pencil brush to add a darker shade to the outer ‘V’ of your eye for depth.
✅ Step 5: Add shimmer
With your flat shader brush or detail brush, press a shimmer shade onto the center of your lid or inner corner.
✅ Step 6: Line the eyes
Use an angled brush with a dark shadow or gel liner to line your upper lash line.
✅ Step 7: Smudge the lower lash line
With a pencil or smudge brush, softly blend a little shadow under your lower lashes for a balanced look.
That’s it! With just a few brushes, you can create a complete eye look that looks polished and pro.
How to Clean and Care for Your Brushes
Taking care of your brushes is just as important as using them. Dirty brushes can cause skin irritation, poor blending, or even eye infections.
How to Clean Them:
-
Use a gentle brush cleanser or mild baby shampoo.
-
Wet only the bristles — avoid soaking the ferrule (the metal part) to prevent loosening the glue.
-
Swirl the brush on your palm, rinse until the water runs clear, reshape the bristles, and lay flat to dry.
How Often to Wash:
-
Eye brushes: at least once a week.
-
Brushes used for cream or gel liners: after every use.
Budget-Friendly Brush Recommendations for Beginners
You don’t have to spend a fortune to get quality brushes. Here are some popular, affordable brush brands for beginners:
-
Real Techniques: Great quality and widely available.
-
e.l.f. Cosmetics: Very affordable and beginner-friendly.
-
Wet n Wild: Budget brushes with surprisingly good performance.
-
Morphe: Famous for large, affordable brush sets.
Pro Tips for Beginners
✅ Less is more: You don’t need 20 brushes. A few well-chosen ones are enough.
✅ Practice blending: Spend time learning how to blend. It’s the secret to professional-looking eyes.
✅ Replace worn brushes: If your brush sheds bristles or loses its shape, it’s time to replace it.
✅ Store properly: Keep brushes upright in a holder to help them keep their shape and stay clean.
Final Thoughts
Mastering eye makeup takes practice, but the right brushes make it so much easier. This beginner eye makeup brush guide is your cheat sheet to start experimenting with confidence. Invest in a few good brushes, keep them clean, and take your time blending — you’ll be amazed at how much better your eye makeup looks.
Remember: brushes are your best friends. Treat them well and they’ll help you create endless looks — from a natural everyday eye to bold, dramatic glam. Happy blending!